This procedure is used when sending the first project to the display unit.
For more information about the Send function, please refer to 34.14.2 How Send/Receive Works.
The IP address preset at the time of purchase can be used to transfer data.
34.3.3 Transfer - Transferring Projects Using the Factory Set IP Address
Please refer to the Settings Guide for details.
34.12 Settings Guide
If transfer is not successful despite following the steps, refer to the following.
Maintenance/Troubleshooting Guide, T.2.4 Unable to transfer project (Ethernet cable)
Connect the LAN cable to the display unit to establish the network with the PC installed with GP-Pro EX. (Designate the same network IP address on your PC.)
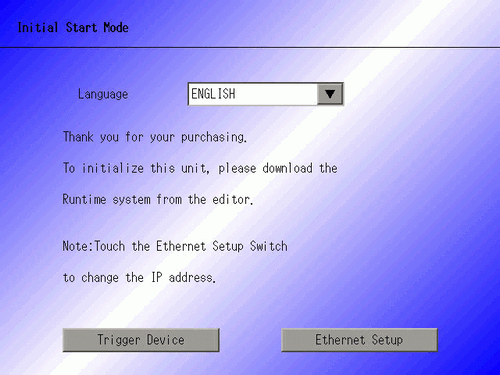
Turn ON the display unit. [Initial Start Mode] screen appears.
This screen appears when you first power up the display unit. After transferring a project once, this screen will not appear.
Once a project has been transferred, the next time you transfer a project, the [Initial Start Mode] screen does not appear. To change the Ethernet settings, do so on the display unit's offline screen.
Maintenance/Troubleshooting Guide, M.4.1 Assigning an IP address to the Display.
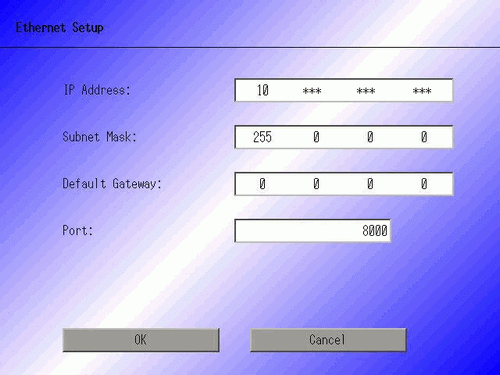
Set the IP address on the display unit. [Ethernet Setup]. Touch to display the following screen and the contents set at the time of transfer.
The IP address is set by default to 10.***.***.***. *** depends on the individual model.
Modify the IP address, subnet mask, and touch [OK].
(For example, First display unit: [IP Address] 192.168.0.1; [Subnet Mask] 255.255.255.0)
Set the IP address of the same network also to other display units.
The confirm restart message appears. Touch [Yes] and the system restarts.
After restarting, the [Initial Start Mode] screen is displayed.
Once a project has been transferred, the next time you transfer a project, the [Initial Start Mode] screen does not appear. To change the Ethernet settings, do so on the display unit's offline screen.
Maintenance/Troubleshooting Guide, M.4.1 Assigning an IP address to the Display.
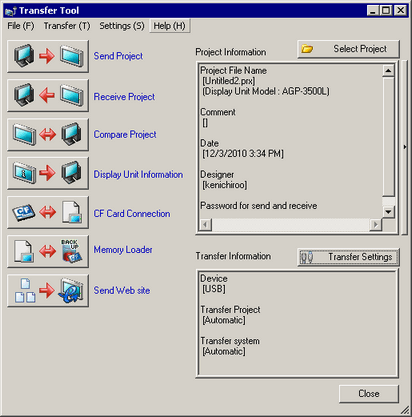
On the GP-Pro EX state toolbar, click the Transfer Project icon and launch the [Transfer Tool].
Confirm the project details in [Project Information].
To transfer a different project, click the [Select Project] button and choose the appropriate project.
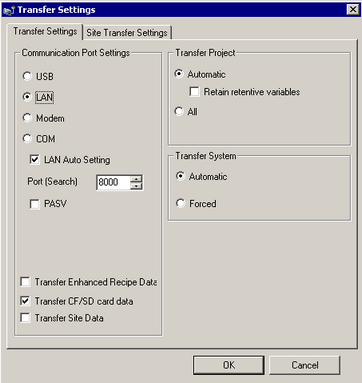
Click [Transfer Setting] to display the [Transfer Tool] dialog box. Ensure that [Communication Port Settings] is set to [LAN]. Select the [LAN Auto Setting] check box and click [OK].
You can also open the same dialog box on the GP-Pro EX's [Project (F)] menu by selecting [Transfer Project (G)] and then [Transfer Settings (C)].
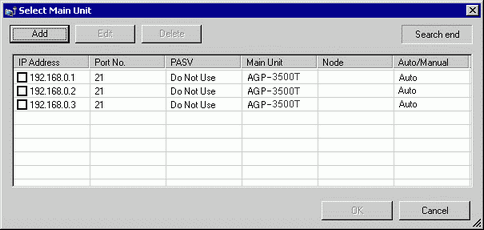
Click [Send Project]. The [Select Display Unit] dialog box displays the IP addresses of the display units available on the network.
Detects the display units connected to the same subnet mask as the PC.
If the IP address is not automatically detected, click [Add] and manually enter the IP address. You can change the port number when WinGP is in use.
If you cannot transfer because of firewall or router restrictions, selecting the [PASV] check box sometimes allows you continue with the transfer.
Select each IP address of the display unit to which you want to transfer and click [OK]. The transfer begins.
When multiple IP addresses are checked, the project is sent to multiple display units at once.
If a password is set for sending and receiving projects, a dialogue box opens and prompts you for a password.
If there is one password for sending and receiving parts for multiple display units, you can skip this step by clicking [Continue to Use the Password].
When the following dialog box appears, click [Yes]. (This dialog box is not displayed when the same project file is sent again.)
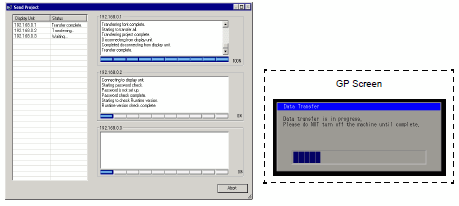
The following dialog box appears during transfer to check the communication status.
The following is an example of sending multiple projects.
(During the transfer, the display unit changes to Transferring mode and communication with the device/PLC is halted.)
If you select multiple IP addresses, the project is transferred to one display unit, then the next, in sequence.
If a project file is password protected, transfer cannot start until the password is confirmed.
If you are transferring to multiple display units, you can skip this step by clicking [Yes to All].
You can cancel the transfer to all units by clicking [No to All].
When transfer is completed, the state of the dialog box changes from [Transferring] to [Transfer Complete].
Click [Close].
(The display unit is reset and the transferred project screen is displayed.)
Click [Close] to return to the Transfer Tool. Click [Close] again to close the Transfer Tool.