![]()
-
Do not use the factory-set IP address when a private address "10.***.***.***" is used on the same network. A network communication error may occur.
The default IP address of the display unit is set at the factory. When transferring with this IP address, change the IP address used by the PC to which you are transferring data.
![]()
Do not use the factory-set IP address when a private address "10.***.***.***" is used on the same network. A network communication error may occur.
![]()
Please refer to the Settings Guide for details.
![]() 34.12 Settings Guide
34.12 Settings Guide
If transfer is not successful even though the steps are followed, refer to the following.
![]() Maintenance/Troubleshooting Guide, T.2.4 Unable to transfer project (Ethernet cable)
Maintenance/Troubleshooting Guide, T.2.4 Unable to transfer project (Ethernet cable)
Modify the PC's IP address subnet mask.
Set the IP address within the range of "10.255.255.1" to "10.255.255.254" and the subnet mask to "255.0.0.0".
![]()
You may have to restart the PC before the settings take effect.
Connect the LAN cable to the display unit to establish the network with the PC installed with GP-Pro EX.
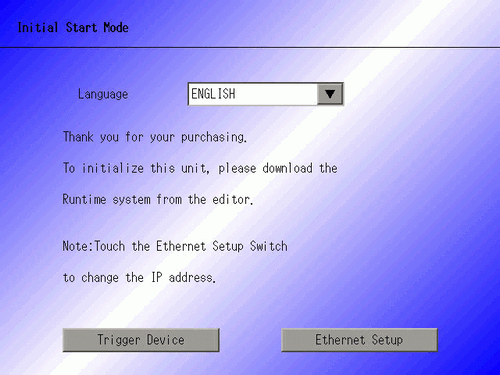
Turn ON the display unit. [Initial Start Mode] screen appears.
Ethernet settings do not need to be set.
![]()
Once a project has been transferred, the next time you transfer a project, the [Initial Start Mode] screen does not appear.
On the GP-Pro EX state toolbar, click the Transfer Project icon ![]() and launch the [Transfer Tool].
and launch the [Transfer Tool].
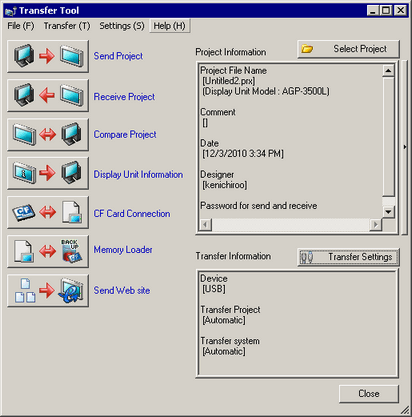
Click the [Transfer Settings] button. The following dialog box appears. Ensure that [Communication Port Settings] is set to [LAN]. Select the [LAN Auto Setting] check box and click [OK].
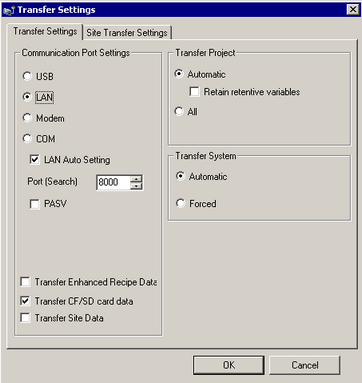
You can also open the same dialog box on the GP-Pro EX's [Project (F)] menu by selecting [Transfer Project (G)] and then [Transfer Settings (C)].
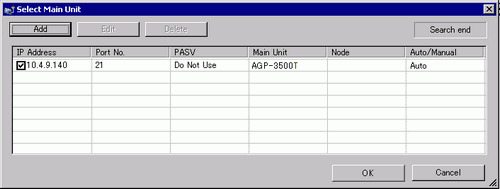
Click [Send Project]. The [Select Display Unit] dialog box displays the IP addresses of the display units. The [Select Display Unit] dialog box displays the IP addresses of the GPs available on the network. The transfer begins. When multiple IP addresses are checked, the project is sent to multiple display units at once.
![]()
If the display unit's IP address and subnet mask have changed, data can not be retrieved.
Ensure that you update these items in the PC settings.
The following dialog box appears during transfer to check the communication status.
(During the transfer, the display unit changes to Transferring mode and communication with the device/PLC is suspended.)
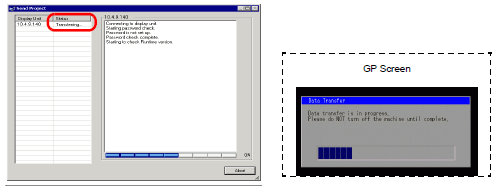
When transfer is completed, the state of the dialog box changes from [Transferring] to [Transfer Complete].
Click [Close].
(The display unit is reset and the transferred project screen is displayed.)
Click [Close] to return to the Transfer Tool. Click [Close] again to close the Transfer Tool.