To start WinGP, double-click the shortcut ![]() on the desktop, or from the [Start] menu, click [All Programs]-[Pro-face]-[WinGP]-[WinGP].
on the desktop, or from the [Start] menu, click [All Programs]-[Pro-face]-[WinGP]-[WinGP].
![]()
You cannot transfer files while in offline mode. Make sure WinGP is in RUN mode.
On the GP-Pro EX state toolbar, click [Transfer Screen] to launch the transfer tool.
Confirm the project details in [Project Information]. To transfer a different project file, click the [Select Project] button and select the project file.
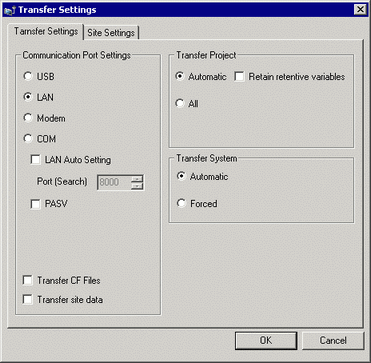
Click [Transfer Settings].
In [Communication Port Settings], select the [LAN] option. Clear the [Automatic] check box and click [OK].
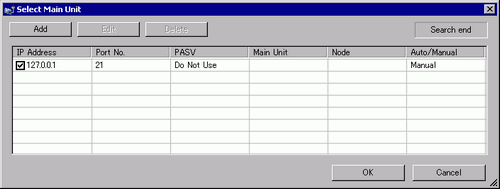
Click [Send a Project]. The [Select Display Unit] dialog box appears.
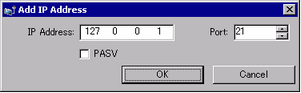
Click [Add], enter [127.0.0.1] in the [IP Address] field, and click [OK].
![]()
The IP address [127.0.0.1] is a virtual address that indicates the computer you are currently using on the network.
If the IP address [127.0.0.1] cannot be used, please use the IP address of the computer you are working on.Make sure that the [Port] number matches the port number specified in the System Settings [Display Unit], [WinGP Settings] tab, [Transfer Settings] area.
Select the [127.0.0.1] check box displayed in [IP Address] and click [OK].
When the following dialog box appears, click [Yes]. (The dialog box will not appear if you transfer the same project again.)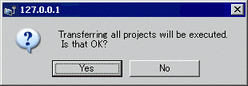
To transfer the project file, you can also use [ProjectCopy] (copy tool). For information on the setup procedure, see the following.![]() 38.3.4.1 When Using a Different Computer for Running WinGP, External Storage Transfer.
38.3.4.1 When Using a Different Computer for Running WinGP, External Storage Transfer.