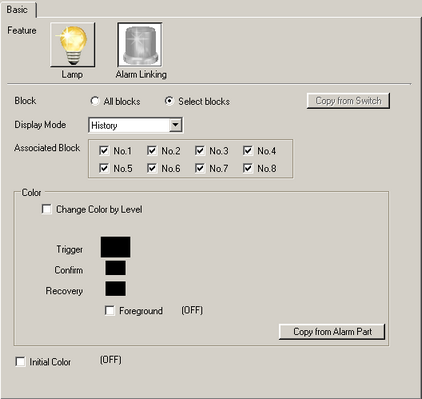
Feature
Choose from [Lamp] or [Alarm Linking].
Lamp
On a switch for the EZ Illuminated Switch, set the lamp feature.
Alarm Linking
On a switch for the EZ Illuminated Switch, set a feature linked with an alarm.
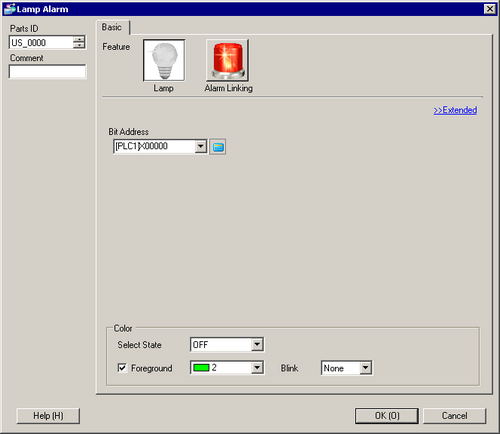
Lamp - Basic Settings
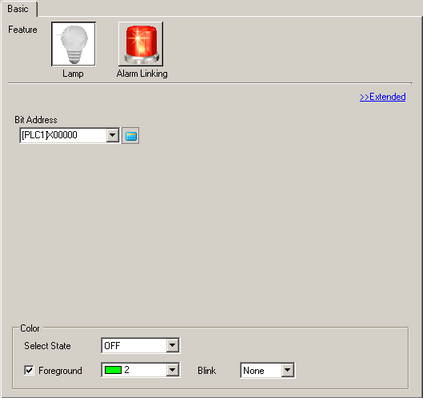
Bit Address
Specify the bit address to turn ON/OFF the lamp.
![]()
To set three or more colors for a lamp using multiple bit addresses or Word addresses, set them in the [Extended] dialog box.
Color
Select State
Select the lamp state from [OFF] or [ON].
Display Color
Select the Lamp color for each state. Select [Display Color] and specify the lamp color. Deselect the check box to turn off the lamp.
Blink
Select the Part blink and blink speed.
Lamp Details
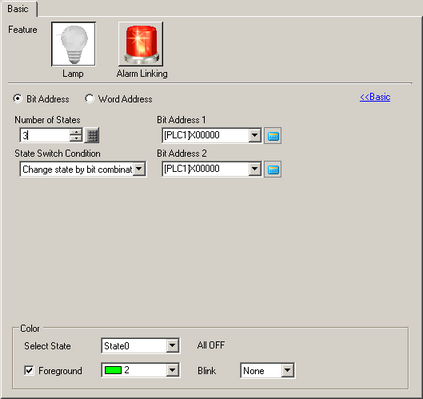
Address Type
Designate the address to operate the state from [Bit Address] or [Word Address].
Number of States
Set the number of display states. Each [State Switch Condition] has a different setting range.
If [Change state by data] is selected: 2...256
If [Change Condition by Bit] is selected
SP5000 series/GP4000 series (excluding GP-410*)/LT4000 series: 2...33
Other models: 2...17
If [Change state by ranges] is selected: 2...256
State Switch Condition
Select the condition for switching lamp display.
Change state by bit
The shape of the lamp changes depending on the ON/OFF status for each word address bit.![]() 13.5 Change When Word Address Bit Changes
13.5 Change When Word Address Bit Changes
Change state by data
You can change the Lamp shape by storing a value between 0 and 255.
The change happens based on the combination of the ON/OFF values of the bottom 8 bits in the specified word address. You can define up to 256 different sets of colors.![]() 13.6 Change When Word Address Value Changes
13.6 Change When Word Address Value Changes
![]()
When [Change state data] is selected and the combination of the ON/OFF values of bits does not match with any of the combinations in the [Number of States], the lamp does not display properly. For example, if the [Number of States] is 3, you can use states 0, 1, and 2. Turning on bits 1 and 2 creates [State 3] which is invalid, and the lamp continues to display its previous valid state. While in invalid state 3, and if you change screens from a different screen to this screen, the lamp itself will not be visible.
Change state by ranges
The lamp shape changes according to the word address value. You can set 1 to 256 ranges for changes. The same state (shape and/or color settings) can be specified for multiple ranges.![]() Change state by ranges
Change state by ranges
Bit Address (1 to 4) /Word Address
Set up an address. The lamp display will change depending on the bit status of the address designated here and the [State Switch Condition].
Color
Select State
Select the Lamp state.
Display Color
Select the Lamp color for each state. Select [Display Color] and specify the lamp color. Deselect the check box to turn off the lamp.
Blink
Select the Part blink and blink speed.
Alarm Linking - All blocks
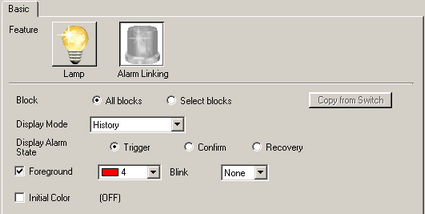
Block designation
Sets [All blocks] to be linked with alarms.
Copy from Switch
Copy the [Block] and [Associated Block] settings from the [Alarm History Switch (Block)] set on the same switch as the lamp alarm on the EZ Illuminated Switch. This function is disabled when [Alarm History Switch (Block)] is not configured.
![]()
The [Copy from Switch] dialog box opens when there are multiple applicable special switches. Select the switch from which you want to copy settings.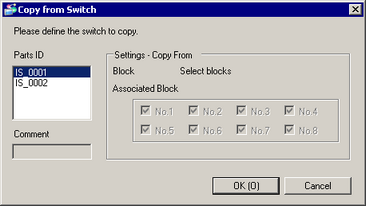
Parts ID
Select the Parts ID to copy from.
Settings - Copy From
Displays block settings for the part specified in the [Parts ID].
Comment
Displays the comment for the part specified in the [Parts ID].
Display Mode
Select the display format for the alarm you want to display.
Display Alarm State
Select the state of the alarm you want to display.
Display Color
Select the Lamp color for state selected in the [Display Alarm State]. Select [Display Color] and specify the lamp color. Deselect the check box to turn off the lamp.
Blink
Select the Part blink and blink speed.
Initial Color
Set the lamp color that is used when there is not even a single alarm. Select [Initial Color] and specify the lamp color. Deselect the check box to turn off the lamp.
Alarm Linking - Select blocks
Block Designation
Sets [Select blocks] for linking blocks with alarms. When using [Select blocks], select the block numbers you want to link to alarms.
Copy from Switch
Copy the [Block] and [Associated Block] settings from the [Alarm History Switch (Block)] set on the same switch as the lamp alarm on the EZ Illuminated Switch. This function is disabled when [Alarm History Switch (Block)] is not configured.
![]()
The [Copy from Switch] dialog box opens when there are multiple applicable special switches. Select the switch from which you want to copy settings.
Parts ID
Select the Parts ID to copy from.
Settings - Copy From
Displays block settings for the part specified in the [Parts ID].
Comment
Displays the comment for the part specified in the [Parts ID].
Associated Block
This is displayed when you have selected [Select blocks] under [Block]. Select the blocks you want to link to alarms.
Display mode
Selects the displaying method of the alarm to be displayed.
Color
Set the display color of alarm.
Change Color By Level
Select this to color code the various Alarm Messages by their attached level set in [Common Settings] - [Alarm]. Choose the color-coding criteria from [Level] or [State+Level].
Level
Display the color based on the level (8 levels from 0 to 7) set for the block in alarm settings.
State+Level
Display the color based on the level (8 levels from 0 to 7) set for the block in alarm settings, and further color-code alarms based on their states, [Trigger], [Acknowledged], or [Recovery].
![]()
The priorities of states are in the higher order of Trigger, Acknowledge, and Recovery. The priorities of levels are from 7 (High) to 0 (Low).
Between states and levels, states have higher priorities. Therefore, if Level 0 Trigger and Level 7 Acknowledge occur, Level 0 Trigger is displayed.
Display Color
Specify the lamp color for each state/level. Select [Display Color] and specify the lamp color. Deselect the check box to turn off the lamp.
Blink
Select the Part blink and blink speed.
Copy from Alarm Part
Copies color settings from alarm part.

Specify Copy from
Screens of Type
Choose from [Base] or [Window Screens].
Screen Number
Select a screen number.
Title
Displays the title of the screen specified.
Parts ID
Lists all alarm parts in the specified screen. Select the part(s) you want to copy.
Comment
Displays the comment for the alarm part selected in the [Parts ID].
Settings - Copy From
Displays the color settings for the alarm part selected in the [Parts ID].
Copy color
Select the color to copy from [Foreground] or [Background].
Initial Color
Set the lamp color that is used when there is not even a single alarm. Select [Initial Color] and specify the lamp color. Deselect the check box to turn off the lamp.
Blink
Select the Part blink and blink speed.