![]()
-
Please refer to the Settings Guide for details.
 10.15 Switch/Lamp Parts Settings Guide
 -
For details on how to draw parts, and defining the address, shape, color, and labels, please see the parts editing topic.
8.7.1 Editing Parts
![]()
Please refer to the Settings Guide for details.
![]() 10.15 Switch/Lamp Parts Settings Guide
10.15 Switch/Lamp Parts Settings Guide
For details on how to draw parts, and defining the address, shape, color, and labels, please see the parts editing topic.
![]() 8.7.1 Editing Parts
8.7.1 Editing Parts
Create a Radio Switch that contains a group of 3 Bit Address switches: M100, M101, and M102.
On the [Parts (P)] menu, point to [Switch Lamp], and select [Bit Switch (B)], or click ![]() to place a switch on the screen.
to place a switch on the screen.
Double-click the placed Switch part. The following dialog box appears.
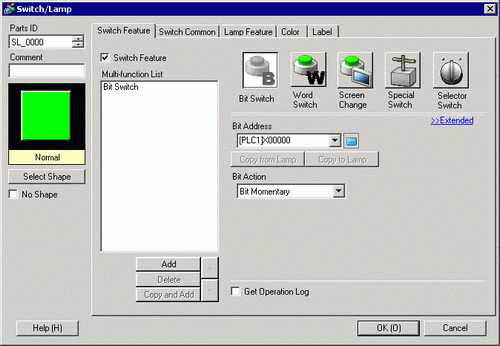
In [Select Shape], select the Switch shape.
From [Bit Action] choose [Bit Set].
Click [Extended].
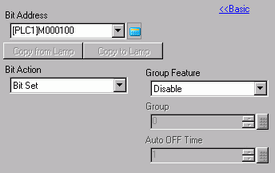
In [Group Feature], select [Group] and set the [Group No.]
As needed, set the color and display text on the [Color] tab and [Label] tab, and click [OK]. The switch that turns ON M100 is complete.
![]()
Depending on the shape, you may not be able to change the color.
When you select a switch and press the [F2] key, you can directly edit the text on the label. When [Text Table] is selected, you can change the current Text Table.
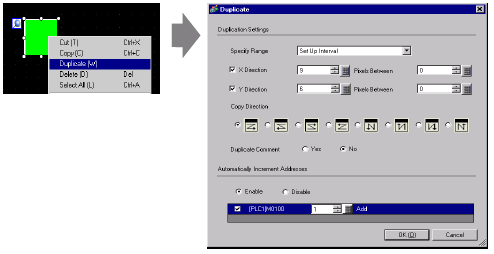
Select the created switch, right-click, and select [Duplicate (W)].
When the [Duplicate] dialog box appears, select [Set Up Interval] in [Input Range] and set [X Direction] = 3 and [Y Direction] = 1. Set [Automatically Increment Addresses] to [Enable], and confirm the increment amount is set to 1. This value is used to increment addresses from the original address of M100. Click [OK (O)].
![]()
For more details about Duplicate, please refer to 8.2.6 Duplicate.
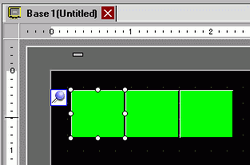
Complete the Radio Switch with the consecutive 3 bit addresses in the same Group Number
![]()
To group multiple switches that have been created one by one on a screen, set the same number for each switch's [Group Number].
If you use [Duplicate], you can create a copy with incremental addresses based on the [Automatically Increment Addresses] and the increment setting.