|
 |
| |
 |
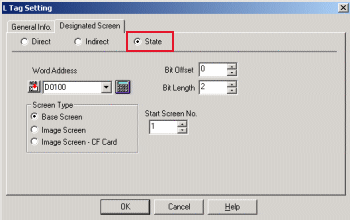
Have you designated the correct Word Address? |
|
| |
|
| |
Please check that Word Address on L Tag Designated Screen and Word Address of PLC are matched. |
| |
Please store the data as below on Word Address. |
| |
| Ex.) |
In case of Bit Offset[0] / Bit Length[2] |
| |
Data to be stored on Word Address
|
|
0 |
Start Screen No. |
1 |
Start Screen No.+1 |
2 |
Start Screen No.+2 |
3 |
Start Screen No.+3 |
|
|
|
| |
|
| |
| In what kind of situation are [Bit Offset] and [Bit Length] used? |
Using [Bit Offset], among 1 Word (16 Bits), you can start one bit as the area to store the data for L Tag from any bit position as you like.
With [Bit Length], among 1Word (16 Bits), you can fix the number of Bits as the area to store the data for L Tag.
Ex.) In case of Bit offset [12] / Bit Length [4], 4 Bits from 12th Bit to 15th bit will be used.
 |
|
|
| |
|
 |
Please check Display Location. |
|
| |
|
| |
Please check whether the objects which you would like to display are located on the center point of the screen.
The center point of the screen which you would like to display is necessary to match on the coordinate of L Tag.
|
| |
|
| |
|
| |
|
 |
Is [Start Screen No.] correct? |
|
| |
|
| |
Please check that [Start Screen No.] exist. Please create the screens, which will be called on L Tag, with sequential numbers from [Start Screen No.]. Also please confirm that the number of the screen that you would like to display is bigger than Start Screen Number. |
| |
|
| |
|
| |
|
 |
Please check overlap with other Tags, Parts, or Fills. |
|
| |
|
| |
If L Tags are put over another L Tag, or over other Parts or Tags, they will not be displayed/erased correctly. In addition, in case of using [Fill] on the original Base Screen which has been called, they will not be displayed/erased correctly when you call it on L Tag. |
| |
|
| |
|
 |
Please try [Rebuild] and [Force System Setup]. |
|
| |
|
| |
[Rebuild] is the tool for optimizing the project file. -> detail
After rebuild, transfer the project file by [Force system setup] again.Also turn on the check box of [Upload Information] and [GP system screen] at [Transfer Settings]. |
| |
|
| |
How to set Force System Setup |
| |
|
| |
Other Checking Points |
Checking Number of Tags |
The Number of Tags (including Parts) which are available on one screen (including Current Window Screen) is up to 128 for GP270/GP370/GPH70, up to 256 for GP70 Series, and up to 384 for GP77/ GP77R/GP2000 Series.
Depending on the Tags, Max Number which can be set is not 384(254/128) for some Tags.
Please refer Tag Reference Manual. |
Simulation Mode
(GP70/77 Series only) |
Please check whether Simulation Mode is displayed or not.
If you can see SIM-LINK at the bottom left of the screen on Offline Mode, Simulation Mode is running. When you transfer, please check off [Send Simulation Data] of [Transfer Settings] . |
|
|
| |
| |


 沪ICP备05028659号-3


 沪ICP备05028659号-3