
Connect a modem to your PC and the display unit to transfer the screen data from your PC to the display unit.
![]()
Ensure the PC has the proper communication settings for the modem. In the Windows [Control Panel], set up the [Phone and Modem Options].
To connect the display unit to a modem, use "CA6-USB232-01", a USB-Serial (RS-232C) conversion cable manufactured by Pro-face (sold separately).
If transfer is not successful even though the steps are followed, refer to the following.![]() "Maintenance/Troubleshooting Guide"- T.2.6 Cannot use modem for transferring
"Maintenance/Troubleshooting Guide"- T.2.6 Cannot use modem for transferring
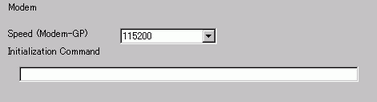
From the [Project] menu, select the [System Settings] and click [Modem].
Select the modem communication speed. The modem settings for GP-Pro EX are now complete.
![]()
For the proper modem settings, please read the manual of the modem.
Click the Transfer Project icon ![]() and launch the [Transfer Tool].
and launch the [Transfer Tool].
Click [Transfer Settings] and the following dialog box will appear. Select [Modem] in the [Communication Port Settings].
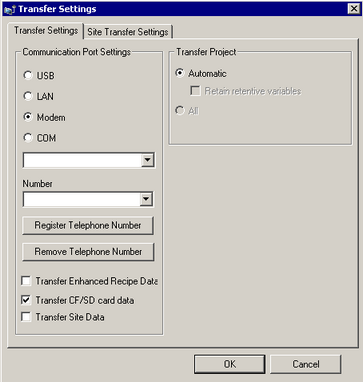
Select the modem. (You can confirm which modems are set up on the PC from the Device Manager dialog box in the Windows Control Panel. ) Enter the telephone number of the modem connected with the display unit in the [Number] field.
If you do not need to transfer data in the CF Card Folder to the CF Card in the display unit, clear the [Transfer CF/SD Card Data] check box and click [OK].
Click [Send Project] to start transferring to the display unit.
The following dialog box appears during transfer to check the communication status.
(The display unit changes to Transferring mode and communication with the device/PLC is suspended.)
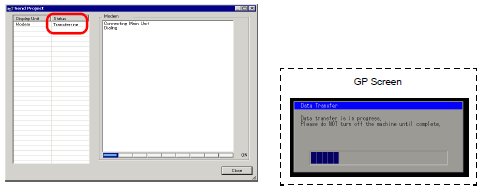
When transfer is completed, the state of the dialog box changes from [Transferring] to [Transfer Complete].
Click [Close].
(The display unit is reset and the transferred project screen is displayed.)
Click [Close] to return to the Transfer Tool. Click [Close] again to close the Transfer Tool.