![]()
See the following for information about address and operation settings.
 25.6.1 Procedure - Collecting, Searching, and Sorting Various Data
When the specified bit address (M100) turns ON, runs the setting to transfer sampled data to cloud services.
![]()
See the following for information about address and operation settings.![]() 25.6.1 Procedure - Collecting, Searching, and Sorting Various Data
25.6.1 Procedure - Collecting, Searching, and Sorting Various Data
Set up Device/PLC
In the Device/PLC Settings, select a series that supports cloud services.
Manufacturer: Yaskawa Information Systems Corporation
Series: MMCloud TCP Client
![]()
For supported cloud services, please refer to "GP-Pro EX Device/PLC Connection Manual".
Open [Individual Device Settings], and in the [Communication Profile] tab select [New] to register the destination tag for the sampled data.
Run Sampling Transfer Settings
Open the Sampling Group's [Address] tab, define the addresses to sample and corresponding data format, and select the [Send to Cloud] check box.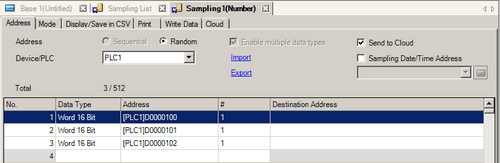
![]()
When you select the [Sampling Date/Time Address] check box and specify a cloud tag in the transfer destination address, the sampling date and time is transferred to the specified address.
In the sampled data list, use the [Destination] column to define the transfer destination cloud tag for each sampled value.
Open the Sampling Group's [Cloud] tab. Click the Global Trigger Settings link to open the [Global Trigger Settings] tab. While the number (1) of the trigger settings you want to add is selected, click [Edit].
In the [Global Trigger] dialog box, set up as follows.
Trigger Type: On data change
Bit Monitoring Address: M100
Trigger Condition: When Bit ON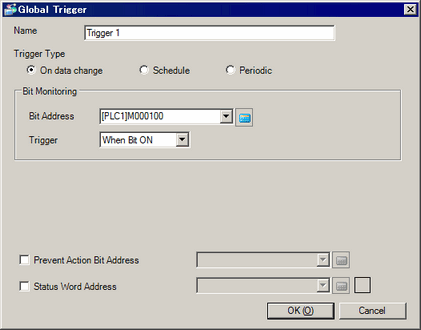
Open the [Cloud] tag again and in the [Trigger to Send] field set up global trigger number 1.