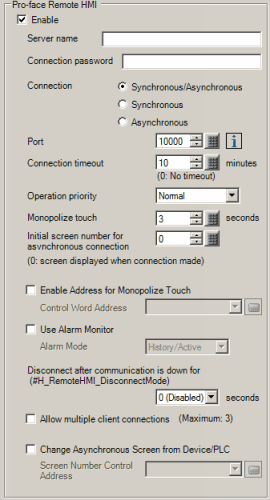

Enable
Sets up the Pro-face Remote HMI function. Select to operate the display unit as a Pro-face Remote HMI server.
Server name
Specify the Server Name within 32 characters. You can use single-byte alphanumeric characters and symbols.
Single-byte symbols: ! " % & ' ( ) * + , - . / : ; < = > ? _
On the client, a server list screen displays, where you can identify the server.
![]()
If you do not want a server name, enter a single-byte space.
Connection Password
Sets the password required for accessing the server from the client.
The password must be 8 to 16 single-byte characters, and must include one upper-case alphabetic character, one lower-case alphabetic character, a number, and one of the following symbols.
Single byte symbols: ! " % & ' ( ) * + , - . / : ; < = > ? _
Connection
Select the connection mode between the client and server.
Synchronous/Asynchronous
After connecting the client and server in synchronous mode, you can switch between synchronous and asynchronous modes from the client side.
Synchronous
Connects in synchronous mode only.
Asynchronous
Connects in asynchronous mode only.
![]()
You can check the connection mode by using the system variable #H_RemoteHMI_Connect_Status.
When the [Connection] is set to [Asynchronous], [Allow multiple client connections] is not supported.
Port number
Sets the port number to use with the Pro-face Remote HMI function. Three consecutive port numbers starting from the specified port number are used.
Connection timeout
Sets the amount of time for the connection timeout.
If the connection timeout time has elapsed with no operations on the client, the server will drop the connection with the client.
If you want the server to keep the connection with the client, set 0.
Operation priority
Selects the frequency of server responses to the client.
Normal
Responses to the client are performed at a frequency of approximately 300 milliseconds.
Display unit
Functions besides RemoteHMI are given priority, which could increase the time a client waits for a response from the server.
Client
The response cycle for clients is faster. Use this option to improve communication and for when you want to update the display in real time.
![]()
For GP4000 Series and LT4000 Series, when the [Operation priority] is set to [Client], [Allow multiple client connections] is not supported.
Monopolize touch
After the server or one of the clients performs a touch or function key operation, it restricts touch and function key operations from other equipment for the amount of time specified in [Monopolize touch].
This feature does not work if 0 has been set.
![]()
When using the GP4000H Series and the [Conversion Adapter] is enabled, even if touch operations are taking place on the client, you can press [F1] or [F2] keys for DOUT output.
Initial screen number for asynchronous connection
Sets the screen number to display when connecting from the client in asynchronous mode, or when changing from synchronous to asynchronous mode.
If you set 0, displays the current screen on the server.
Enable Address for Monopolize Touch
You can use a word address to manually enable touch operation on either the client side or the server side.
Control Word Address
Set the word address to control the touch operation.
Value |
Description |
0(00) |
Word address switching function is disabled |
1(01) |
Only server-side touch operations are enabled*1 |
3(11) |
Only client-side touch operations are enabled |
*1 When using models without a display, you cannot run client-side control associated with touch operations. Please be careful.
![]()
When you set up a value other than those in the table in the control word address, the ability to change touch between client/server is diabled.
You can check the status of monopolize touch by using the system variable #H_RemoteHMI_Touch_Status.
Use Alarm Monitor
You can check whether an alarm has been triggered on each server using the client server list screen.
![]()
Only alarms set up with alarm history can be used with the alarm monitor. You cannot check on banner or alarm summary alarms.
Alarm Mode
History/Active
Checking the alarm [History] or [Active] history data, you can share with the client whether or not the alarm has been triggered. Use this when you want to know if the alarm has been triggered or if you want to know the recovery status.
![]()
The alarm history data is necessary. From the GP-Pro EX menu, under the [Common Settings] - [Alarm] - [Common] tab, set the number of records in "History" or "Active".
Setting both "History" and "Active" in the alarm settings will share the alarm triggered status of the Alarm Monitor for both.
Log
Checking the alarm [Log] history data, you can share with the client whether or not the alarm has been triggered. Even when the alarm recovers and alarm triggered data remains in history data, indication of alarm triggered is displayed on the client side.
![]()
The alarm history data is necessary. Set the "Log" data size in the [Common Settings] - [Alarm] - [Common Settings] tab from the GP-Pro EX menu.
Disconnect after communication is down for (#H_RemoteHMI_DisconnectMode)
Set the default value of #H_RemoteHMI_DisconnectMode. The unit is one second.
#H_RemoteHMI_DisconnectMode. When using this system variable, the system disconnects the Remote HMI client after the number of seconds defined in the system variable elapses. The regular time out is 30 seconds.
When a connection problem occurs while client operations are taking place, you can use this property to prevent unintended operation due to quickly closed connections. A.2.2.2 Word Type - #H System Variables
Allow multiple client connections
Multiple clients can connect to the server at the same time. The maximum number of connections depends on the server.
IPC Series, SP5000 Series: 5 clients
GP4000 Series (excluding GP-4201TM, GP-4301TM and GP-Rear Module), LT4000 Series: 3 clients
GP-4201TM, GP-4301TM, GP-Rear Module: 2 clients
In asynchronous mode, only one client can connect. When there is a client connected in asynchronous mode, other clients cannot change to asynchronous mode.
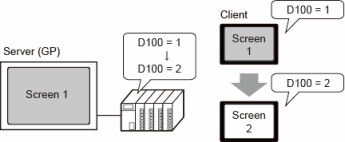
Change Asynchronous Screen from Device/PLC
Use the device/PLC to change screens on clients set to asynchronous mode.
Select when the Pro-face Remote HMI [Enable] check box is selected, and the [Connection] is set to either [Synchronous/Asynchronous] or [Asynchronous].

![]()
Mapped to the device/PLC, when bit 15 (forced screen change bit) of the System Data Area's [Change-To Screen] address is ON, change screen operation on the client via the change screen switch is unavailable. However, screen changes from the screen number control address operate.
Screen Number Control Address
Enter the word address for changing screens on clients set to asynchronous mode from a device/PLC.
[Screen Number Control Address] stores the screen number (current value) of the client connected via asynchronous mode.
![]()
You cannot set up indirect device addresses.
The data format depends on the format of the [Data Type of Display Screen Numbers] option, available from the [System Settings], [Display Unit] link, in the [Display] tab's [Screen Settings] area. 5.4.2.1 Display Unit [Display] - Screen Settings