
When automatically transferring from the device/PLAN to an external storage device, you can automatically allocate file numbers to create new files. To set up this function, open the [CSV Data Transfer Condition] dialog box and click the [Extended] tab.
The automatic numbering action is as follows:
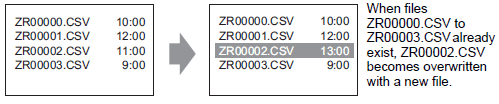
A new file name is created by adding +1 to the file number with the most recent time stamp among existing files in external storage.
If no free space is left, the file with the oldest time stamp is deleted and a new file is created by adding +1 to the last saved file number.
When the file numbers saved to the external storage device are not sequential, a new file name is created by adding +1 to the file number with the most recent time stamp among existing files.

![]()
If the file numbers do not conform to time stamps in automatic numbering mode (when files are overwritten by manual transfer), a new file is created by increasing the most recent File Number by +1.
When using automatic numbering, do not use manual transfer (Device/PLAN to external storage) to allocate file numbers. These files will be overwritten.
Regardless of the timestamp of a manual transfer, files are overwritten, in order, from the number of the last automatically numbered file plus one.
If the file number reaches the [End], data will not be transferred even if the [Control Word Address] turns ON. To continue transferring data, use the [Loop] feature or specify the [Resume Bit Address].
When you enable the [Loop] feature, after the [End] is reached, data is overwritten starting from the [Start] and the transfer continues.
For example, when the Condition are: [Start] = 0, [End] = 4

When using a Resume Bit Address
When the [End] is reached and the designated [Resume Bit Address] turns ON, then the next time the [Control Word Address] turns ON, the [Start] file gets overwritten and the other files after that are overwritten and transferred.
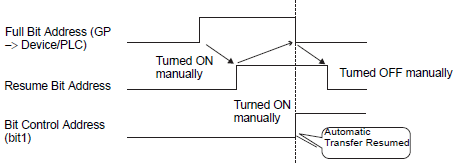
Automatic Numbering Timing Chart
When you create files from [Start] to [End], the [Full Bit Address] turns ON and automatic transfer ends.
To run automatic transfer again, turn ON the [Resume Bit Address], then turn ON bit 1 of the [Control Word Address]. Files are overwritten and created in order starting from the [Start].
When the [Resume Bit Address] turns ON, the [Full Bit Address] is turned OFF. Check that the [Full Bit Address] is turned OFF and turn OFF the [Resume Bit Address].
![]()
Transfer may not work when files already exist up to the end number in external storage. When the display unit is turned ON, right after turning ON bit 1 in [Control Word Address], [Full Bit Address] turns ON. However, if the [Resume Bit Address] is ON, when you turn ON bit 1 in the [Control Word Address], files are overwritten beginning at the start number.
Before running the Transfer operation, you should check the file number stored in external storage and also check the state of [Resume Bit Address].