![]()
-
Please refer to the Settings Guide for details.
 7.9 Settings Guide
![]()
Please refer to the Settings Guide for details.
![]() 7.9 Settings Guide
7.9 Settings Guide
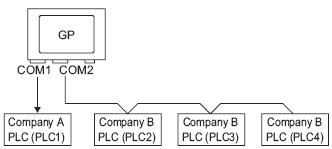
For example, if there is a project file which is configured with COM1 (Company A's PLC) and PLC1 (for example, Omron, CS/CJ Series HOST Link) and you want to add COM2 (Company B's PLCs) PLC2, PLC3, and PLC4 (3 units of Mitsubishi Electric, A Series Computer Link), use the following steps.

From the [Project] menu, select [System Settings], and click [Device/PLC].
Click [Add Device/PLC].
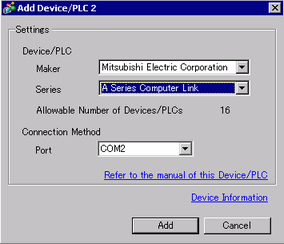
In the [Add Device/PLC 2] dialog box, select the Device/PLC [Manufacturer], [Series], and connection [Port]. Click [Add].

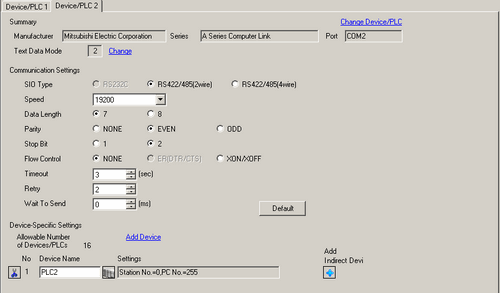
When the [Device/PLC2] tab appears, click [Add Device] to add 2 PLCs.

![]()
Every time [Add Device] is clicked, another PLC is added.
Set the name of each added PLC with up to 20 single-byte characters.
![]()
When adding the desired [Device Name], ensure not to repeat names.
Click the Device/PLC ![]() icon. The [Individual Device Settings] dialog box appears. Set up each corresponding PLC. (The following image shows the [Individual Device Settings] dialog box used for the Mitsubishi Electric A Series Computer Link type.))
icon. The [Individual Device Settings] dialog box appears. Set up each corresponding PLC. (The following image shows the [Individual Device Settings] dialog box used for the Mitsubishi Electric A Series Computer Link type.))

![]()
The [Individual Display Unit] differ depending on the PLC. For details on the settings of the device/PLC, see "GP-Pro EX Device Connection Manual."