The display unit clock is updated periodically, or on a specified timing. The display unit reads the value from the defined address as the clock data.
![]() Procedure - When using a driver that does not support automatically updating the time
Procedure - When using a driver that does not support automatically updating the time
When using any of the following devices/PLCs, you can automatically load the clock data from the device/PLC to the display unit without specifying a device address.
![]() Procedure - Automatically updating the time
Procedure - Automatically updating the time
|
Manufacturer |
Series |
|
Mitsubishi Electric Corporation |
FX Series CPU Direct FX Series Computer Link Q/QnA Series Ethernet |
|
Omron Corporation |
CS/CJ Series HOST Link CS/CJ Series Ethernet |
|
Panasonic Electric Works SUNX Co., Ltd. |
FP Series Computer Link SIO |
![]()
For models supporting the Clock Update Settings, refer to the following.
![]() 1.5 Supported Features
1.5 Supported Features
Even if you use one of the above drivers, you may not be able to automatically update the time depending on the device/PLC CPU. For supported CPUs, see the associated driver's "GP-Pro EX Device/PLC Connection Manual".
When resetting or turning OFF a GP-4100 series, GP-4201TM, or GP-4301TM display unit, its clock is initialized. Use the clock update feature to automatically set the display unit clock. Please refer to the Settings Guide for details.
![]() 5.5.1 Common - Clock Update Settings
5.5.1 Common - Clock Update Settings
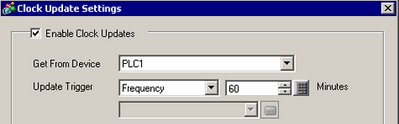
Procedure - Automatically updating the time
Read the device/PLC clock and update the display unit clock every hour.
From the [Common Settings], select [Clock Update Settings].
Select the [Enable Clock Updates] check box, and from the [Get From Device] list select the device/PLC for updating the clock.

From the [Update Trigger] list select [Frequency], and specify an interval of 60 minutes.
Click [OK].
Procedure - When using a driver that does not support automatically updating the time
Read data from addresses D10 to D15 and update the display unit clock every hour.
From the [Common Settings], select [Clock Update Settings].
Select the [Enable Clock Updates] check box, and from the [Get From Device] list select the device/PLC for updating the clock.
From the [Update Trigger] list select [Frequency], and specify an interval of 60 minutes.
Select the [Customize] check box.
In the [Time Area Start Address] field define the first address with the clock data. In the [Read Area Size] field define the number of words that store the clock data. For example, [Read Area Size] = 6, [Format] = [Word]

For each address, specify what is stored in the word, [Year], [Month], [Day], [Hours], [Minutes], or [Seconds].
Click [OK].