Status Display
Displays the shape and status of the Part selected in [Select Shape].
Select Shape
Open the Select Shape dialog box to choose the shape.
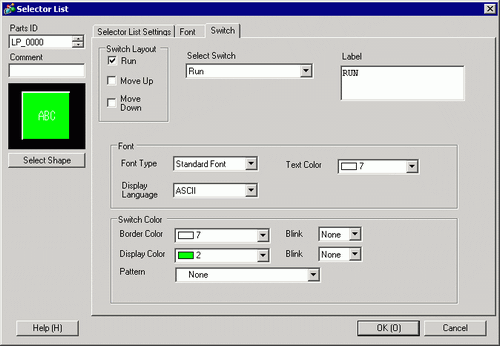
Switch Layout
Specify whether to place a switch that operates a list.
Run
Run the operation selected from the list.
Move Upward
Scroll up the drop-down list.
Move Downward
Scroll down the drop-down list.
Select Switch
From among the switch types enabled in the [Switch Layout], choose the switch whose operation, label, color, and so on, you want to set up.
Number of Moves
When using [Move Up] or [Move Down], define the scroll movement in the [Number of Scroll Moves] field.
Continuous Move Feature
When [Detail Action] is selected as [Move Upward] or [Move Downward], select whether or not to move continuously while the Switch is pressed.
This function does not exist on the Alarm part.
Label
Enter the text of label to display on the switch. Up to 400 characters (100 characters per row, 4 rows) can be inputted.
![]()
When you select a switch and press the [F2] key, you can directly edit the text on the label.
Font Type
Select either [Standard Font] or [Stroke Font].
Standard Font
You can specify the vertical and horizontal dimensions of a character in bitmap fonts. When you magnify/shrink characters, the outline may become rough or the letter may appear compressed.
Stroke Font
This is an outline font where the ratio of the character height/width is fixed. The letters will have a smooth outline even if you magnify/shrink them. However, this font uses more disk space on the display unit.
Text Color
Set the display color for the text.
Display Language
Select a language for the label from [Japanese], [ASCII], [Chinese (Traditional)], [Chinese (Simplified)], [Korean], [Russian (Cyrillic)], or [Thai].
Border Color
Select a border color for the Switch.
Display Color
Select the Switch color.
Pattern
Select the pattern from among 9 types.
Pattern Color
Select the pattern color.
The Switch color appears as a combination of the [Display Color] and [Pattern Color].
Blink
Select the Part blink and blink speed. You can choose different blink settings for the [Border Color], [Foreground], and [Pattern Color].
![]()
Depending on your display unit's model and [Color] settings, you may not be able to set Blink (from the [Project] menu, point to [System Settings] and click [Display Unit]).
![]() 1.6 Supported Colors
1.6 Supported Colors
Color
Select the Switch color. The display will show a different colored image as the selected part image.
![]()
Depending on the shape, you may not be able to set the [Display Color], [Pattern Color], [Border Color], [Color], and so on.