
Communication Port Settings
USB
Select when using a USB cable to transfer screens.
![]()
When connecting the USB data transfer cable (CA3-USBCB-01) and the ZC9USCBMB1 cable or standard USB cable (Type A mini B), and in the [Transfer Tool] you click [Receive Project], [Display Unit Information], or [Send Web site], the [Select USB Cable] dialog box will display. Select which USB cable to use.
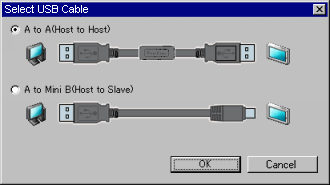
[A to A (Host to Host)]: Select when using [CA3-USBCB-01].
[A to Mini B (Host to Slave)]: Select when using [ZC9USCBMB1] or commercial USB cables (Type A mini B).
LAN
Select when using Ethernet (LAN) to transfer screens.
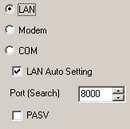
LAN Auto Setting
Select to automatically search all display units on the network.
Port (Search)
When [LAN Auto Setting] is designated, set the port number used during search.
PASV
Select if [LAN] is selected but data cannot be transferred due to network security.
Modem
Select this option to use a modem to transfer projects.
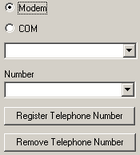
Phone Number
Enter the phone number for the modem.
Register Telephone Number
Registers telephone numbers. You can register up to 100 phone numbers.
Delete Telephone Number
Delete registered phone numbers.
COM
Specify when transferring projects using a COM port.
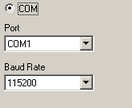
Port
Select the COM port to use from COM1 to COM9.
Baud rate
Select the communication speed from 9600/19200/38400/57600/115200. Select the same speed as you selected in [Modem] in the system settings.
Transfer Enhanced Recipe Data
Specifies whether or not to send enhanced recipe data when transferring project data.
Transferring CF/SD card data
Specify whether to send the data in the destination folder to the CF/SD Card in the display unit. If you do not wish to replace the data on the CF/SD Card, clear the check box.
Transfer Site Data
Specify whether to send the standard HTML template in the folder set for [Data Transmission] in [Site Transfer Settings].
Transfer Project
Auto
The project to be transferred is compared with the project on the display unit. If they are the same project, only updated or added screen data are sent.
When sending a new or different project, the whole project is sent after you click [OK] in the confirmation message.
All
Sends the whole project to be transferred. Overwrites the existing project on the display unit.
Start initialization
Sets the target for initialization when transferring the project.
Variables
Select the check box when initializing the project with the current variables. Current values as well as retentive setting variables are initialized.
Backup Memory (SRAM)
Select the check box when initializing the project with backup memory data.
![]()
Even when the backup memory (SRAM) check box is not selected, data that is stored in the display unit's backup memory (SRAM) is deleted depending on project transfer conditions. Refer to the following about conditions where data that is stored in backup memory (SRAM) becomes deleted.
![]() 34.13.1 Transfer Restrictions
34.13.1 Transfer Restrictions
Transfer System
Auto
When you send the project, GP-Pro EX automatically compares between the project system version and the GP system version, and, if necessary, downloads the system program*1, the protocol program*2, and the font*3 to the display unit.
These items are downloaded in the following cases:
When you perform a transfer when the display unit has no data (factory default)
If the system program (Runtime) version stored on the display unit is older than the GP-Pro EX version.
When old versions of protocol programs (drivers) are stored in the display unit, or when project device/PLC settings have been added or changed.
When a font not in the display unit was used in GP-Pro EX.
Forced transfer
After you format the GP and send a project, GP-Pro EX will forcibly download the system programs*1, protocol programs*2, and fonts *3 to the display unit.
These are downloaded even if the GP-Pro EX system is a previous version of the current system on the display unit.
*1 Data used to operate the project on the display unit.
*2 Data needed to communicate with the device/PLC to be used.
*3 Font data used by the project.
Connect the computer and the display unit using 2 cables.
![]()
A: User created cable
Create the cable based on the diagram below.
![]()
B: RS232C-USB Conversion cable
Use "CA6-USB232-01", a USB-Serial (RS-232C) conversion cable manufactured by Pro-face (sold separately).