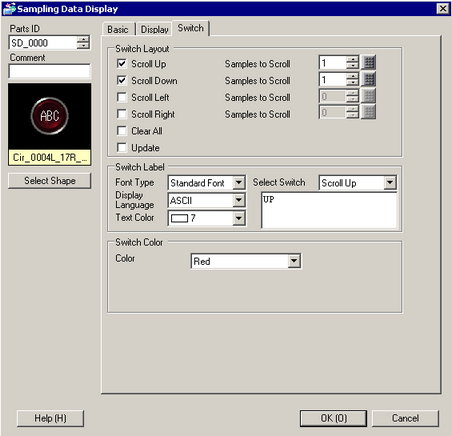
Set the Switches to scroll the display of the Sampling Data Display.

Part Shape
Displays the shape that you chose for the switch with [Select Shape].
Select Shape
Open the [Select Shape] dialog box to choose the switch shape.
Switch Layout
Scroll Up/Scroll Down/Scroll Left/Scroll Right
Select whether or not to place switches to scroll the display data in each direction.
Samples to Scroll
When selecting a switch to place, set how many rows or columns it will scroll when pressed.
Clear Search/Sort
If you display a sampling group which has [Refine Search / Sort] selected in the [Display/Save in CSV] tab (accessible from [Common Settings] - [Sampling]), clicking this button clears the search/sort result and displays the original sampled data.
Update Search/Sort
By touching this switch, the sampling data display is updated including new sampled data.
![]()
Touching this switch does not update the display while operating [Edit data].
When scrolling
This is used when the sampling data display no longer updates due to scrolling.
When searching/sorting
This is used when resuming searching/sorting that includes newly sampled data.
Switch Label
Font Type
Choose the label font for the switches from [Standard Font] or [Stroke Font].
Display Language
Select a language for the label on the switch from [Japanese], [ASCII], [Chinese (Traditional)], [Chinese (Simplified)], [Korean], [Russian (Cyrillic)], or [Thai].
Text Color
Select the font color that will display on the switch labels.
Select Switch
Select a switch whose label you will set from among the placed switches.
Label
Enter the text that you want to display on the switch selected in [Select Switch].
Switch Color
Border Color/Display Color
Select a color and border color for the Switch.
Pattern
Select the switch pattern from 9 types.
Pattern Color
Select the switch pattern color.
Blink
Select the blink and blink speed. You can choose different blink settings for the [Border Color], [Display Color] and [Pattern Color].
![]()
Depending on your display unit's model and [Color] settings, you may not be able to set Blink (from the [Project] menu, point to [System Settings] and click [Display Unit]).
![]() 1.6 Supported Colors
1.6 Supported Colors
![]()
Depending on the shape of the switch you selected in [Select Shape], [Switch Color] may not be changed.
When you select a switch and press the [F2] key, you can directly edit the text on the label.