From the [Common Settings (R)] menu, point to [Security (Q)] and select [Security Password (P)] or click ![]() on the toolbar.
on the toolbar.
In the Set Password screen, select the [Enable Security Function] and [Add User ID] check boxes. Click [Create] to add one set of passwords. Each click adds one row to the registration area.
Set the security level, user ID, and password for status monitoring and maintenance staff (for example, Status Monitoring: [Level] = "1", [Password] = "1111", [ID] = "Monitor"; Maintenance: [Level] = "15", [Password] = "5555", [ID] = "Admin").

![]()
-
Each password should be 8 single-byte characters or less.
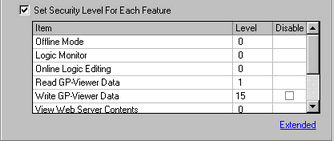
Next, select the [Set Security Level For Each Feature] check box and define the security level set in the above procedure 2 for each [Item]. For example, [Read GP-Viewer Data] = Level "1", [Write GP-Viewer Data] = Level "15"

![]()
-
When defining [Read GP-Viewer Data], first set up the level for [Write GP-Viewer Data].
-
If you select Disable, the function cannot be performed regardless of the security level.
-
After selecting Disable, if you want to change it to Enable, modify the project file with drawing software and then transfer it again. You cannot change it to Enable from offline mode.