![]()
-
Please refer to the Settings Guide for details.
 3.8.1 Creating a New Project
Start GP-Pro EX to create a new project file. The startup procedure is the same as 3.2 Creating a Project - Start / Create Screen / Save / Exit.
![]()
Please refer to the Settings Guide for details.
![]() 3.8.1 Creating a New Project
3.8.1 Creating a New Project
Drawing
In GP-Pro EX, draw the screen interface. Refer to the following for the drawing process. You can also refer to chapters related to particular features, such as alarms.
![]() 3.2 Creating a Project - Start / Create Screen / Save / Exit
3.2 Creating a Project - Start / Create Screen / Save / Exit
![]()
There are differences in which features can be used in the Web Server. The following describes which features you can use in Web Server.
![]() 1.5 Supported Features
1.5 Supported Features
Web Server Function
From [Project] menu, point to [System Settings] and click [Display Unit] and select the [Remote Viewer] tab. In the [Web Server] area, select the [Enable Web Server] check box. For [Destination], select where to transfer the standard HTML template required by the Web Server from [CF Card] (or [SD Card]) and [USB Storage], and define the destination [Folder]. For example, [Destination] = CF Card, [Folder] = WebSite, [Default page when there is no file name] = default.html, [HTTP Port Number] = 80

Security feature
Sets up security to restrict which people can display and operate data displayed on the Web Server. Set up security level 15 and password "5555" for maintenance staff. Set up security level 1 and password "1111" for status monitoring staff.
![]()
You can use the Web Server without setting up any security.
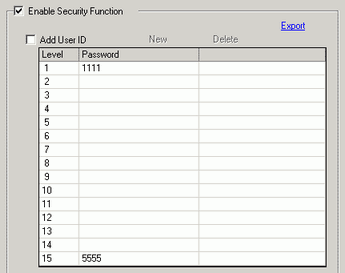
In GP-Pro EX, from the [Common Settings (R)] menu point to [Security (Q)], select [Security Password (P)], or click ![]() .
.
Password setting screen will open. Check [Enable Security Function] and input password "1111" in [Level 1] and password "5555" in [Level 15].
![]()
To set up user IDs for each level, see the following.
![]() 37.14.2 Procedure - Restricting Access to the Web Server (Security) / User ID Mode
37.14.2 Procedure - Restricting Access to the Web Server (Security) / User ID Mode
Next, when you select the [Set up Functions at Each Security Level] check box, you can define which functions are permitted at each security level.
For example, [Read Web Server Data] = Level 1, [Write Web Server Data] = Level 15
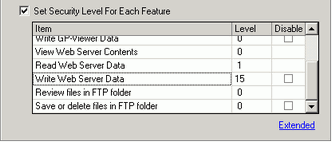
![]()
If you select Disable, the function cannot be performed regardless of the security level.
After selecting Disable, if you want to change it to Enable, modify the project file with drawing software and then transfer it again. You cannot change it to Enable from offline mode.
In order to use the Web Server feature, the following two types of data transfer must be performed.
Transfer Project Files to the Display Unit
Transfer the Standard HTML Template to the external storage.
Transfer Project File
Transfer Project Files to the Display Unit.
For the procedure for transferring project files, refer to the following.
![]() 34.1 Settings Menu
34.1 Settings Menu
Transferring the Standard HTML Template
On the GP-Pro EX state toolbar, click the Transfer Project icon to activate [Transfer Tool].
Click [Send Web site] to display the following dialog box. In the [Transfer From] field, identify the location of the standard HTML template. Create a folder to save the template to be transferred in the destination media, and enter the name of the folder. (For example: Website). Click [OK] to start transfer.
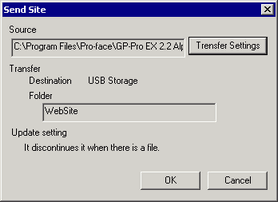
![]()
To use the Web Server, be sure to transfer the standard HTML template to the display unit.
The standard HTML template is installed in C:\Program Files\Pro-face\GP-Pro EX*.**(*.** represents a version)\HTMLContent. For transfer methods, refer to the following.
![]() 34.12.1.2 Site Transfer Settings
34.12.1.2 Site Transfer Settings
The system program on the display unit (Runtime) must be GP-Pro EX Version 2.10 or later, or you cannot transfer the standard HTML template to the display unit.
You can run project file transfer and the standard HTML site transfer at the same time. Click [Settings], and in the [Transfer Settings] screen, click the [Transfer Settings] tab and select the [Transfer Site Data] check box. For more details, please refer to the following.
![]() 34.12.1.1 Transfer Settings
34.12.1.1 Transfer Settings
If you upgrade Runtime, please also upgrade (transfer and overwrite) the HTML template. Otherwise, it may not function properly.
When transfer is completed, the state of the dialog box changes from [Transferring] to [Transfer Complete]. Click [Close].
Connecting the Display Unit and Computer
Use the Ethernet cable to connect the display unit to the computer.
![]()
To communicate using Ethernet, Ethernet settings, such as the IP address and port number, must be set up on the display unit.
![]()
Set up the display unit's IP address in Offline mode. Touch [Main Unit Settings] and [Ethernet Local Settings]. For details on the setup procedure, refer to the following.
![]() Maintenance/Troubleshooting Guide, M.4.1 Assigning an IP address to the Display
Maintenance/Troubleshooting Guide, M.4.1 Assigning an IP address to the Display
Your computer or network card may not support direct connections with the display unit via an Ethernet cable. If communication is not possible, please use a hub and try connecting again.