Set up the initial screen displayed after powering up, and the standby mode settings.
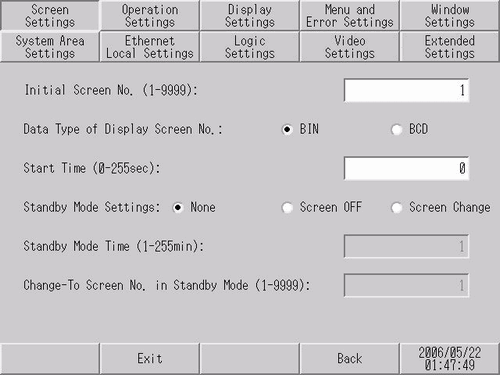
Set the number of the screen that displays at startup.
![]() 11.2 Selecting the Startup Screen
11.2 Selecting the Startup Screen
![]()
Set the screen number from 1 to 9999 when the [Data Type of Display Screen No] is [Bin], and from 1 to 7999 for [BCD].
Data Type of Display Screen No.
Select the data type of the screen number for change screen operations. Select either [Bin] or [BCD].
Start Time
Set the time it takes for the display to start up after the power turns ON, from 0 to 255 seconds.
Standby Mode Settings
Select the standby mode from [None], [Screen OFF], or [Screen Change].
[None]
The screen does not change to standby mode.
[Screen OFF]
[Standby Mode Time]. When the defined time elapses since the last touch screen operation, screen change, alarm banner or display of any other message, the screen is cleared.
[Screen Change]
[Standby Mode Time]. When the defined time elapses since the last touch screen operation, screen change, alarm banner or any other message, the screen changes to the screen defined in the [Change-To Screen No in Standby Mode] field.
![]()
For models that support changing the backlight color, when the backlight changes to red, the screen continues to display even when Standby Mode is set to [Screen OFF].
When a logic program is terminated on the GP4000 series (excluding the GP-4100 series), and LT4000 series , even if [Screen OFF] is selected it will not turn off the screen display. If logic programs stop during standby mode, the hidden screen reappears.
For the GP4000 series (except the GP-4100 series, GP-4201TM and GP-4301TM), selecting [Screen OFF] causes the status LED on the display unit in standby mode to fade in/out. (Breathing LED is the display when the LED repeatedly and slowly turns ON and OFF.)
When [Screen Change] is selected, you cannot use a [Previous Screen] switch to return to the screen that displayed before the Standby Mode Time elapsed.
Standby Mode Time
To protect the display, set the time from 1 to 255 minutes after which the screen is cleared. Automatically clears the screen display or changes to the set screen when the set time passes without any display operations.
Change-To Screen No. in Standby Mode
When the [Standby Mode Settings] is [Screen Change], set the screen number to change to after the [Standby Mode Time] elapses.
![]()
Set the screen number from 1 to 9999 when the [Data Type of Display Screen No] is [Bin], and from 1 to 7999 for [BCD].
Dimmer
Specifies whether or not to reduce the screen brightness when no operations are performed over a defined period of time.
If [Enable] is selected and there are no operations over the defined period of time, the brightness is reduced. Because you can still check the details on a dim screen, less power is consumed than on a bright screen.
Any operations on the display unit returns the screen brightness to its original state.
![]()
For models supporting dimmer settings, you can set the feature by touching ![]() .
.
The following section lists models compatible with dimmer settings.
![]() 1.5 Supported Features
1.5 Supported Features
Dimmer Timer
Specifies the time that needs to elapse after the last operation on the display unit before it is dimmed. Select a value from 1 to 300 seconds.
Dimmer Level
Specifies the brightness when the screen is dimmed. Select a level from 0 to 15 (Bright: 0 - Dark:15).
![]()
The range you can set varies depending on the model you use. Please refer to the following for details on setting ranges.
![]() 1.5 Supported Features
1.5 Supported Features
Initial screen is displayed after USB storage is recognized.
Set when connecting to the USB storage prior to turning the display unit power ON when using a GP4000 series unit.
Select [Enable] when the system is designed to access USB storage immediately after startup of the display unit.
Initial Screen displays after waiting for USB storage connection confirmation (mount).