M.12.3 Forcing the transfer of project files
If a project file cannot be transferred, you can force the display unit into transfer mode (waiting to receive project).
There are two ways to enter forced transfer mode:
Forced transfer by touching the screen
Using screen touch, you can forcibly transfer a project file.
For the GP-4000 and LT-4000 series, you can also run forced transfer using external storage.
Using screen touch, you can forcibly transfer project files from GP-Pro EX.
-
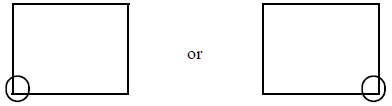
When the power is turned on, continue touching the bottom left corner or the bottom right corner of the panel (within a 40 pixel area).
-
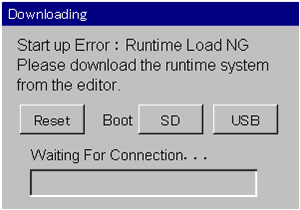
When the following dialog box appears, transfer project files from GP-Pro EX.
After transfer is complete, the display unit restarts and the transferred project's initial screen is displayed.

-
For GP-4000 and LT-4000 series
Using screen touch, you can forcibly transfer project files from GP-Pro EX.
-
When the power is turned on, continue touching the bottom left corner or the bottom right corner of the panel (within a 40 pixel area).
-
When the following dialog box appears, transfer project files from GP-Pro EX.
-
When using external storage for the GP-4000 and LT-4000 series
In addition to transferring from GP-Pro EX, forced transfer is possible using external storage.
For forced transfer using external storage, from the [Memory Loader]'s [Transfer Tool] command, select [Create Backup File].
For the procedure on how to create backup data, see the following section.
 34.8.1 Transfer - Transferring Project Files from PC to Display Unit
-
When the power is turned on, continue touching the bottom left corner or the bottom right corner of the panel (within a 40 pixel area).
-
When the following dialog box appears, touch [SD] or {USB].
-
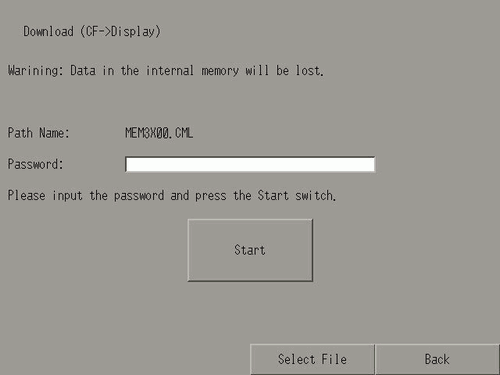
This will restart the display unit and launch the Memory Loader tool. Touch [Download] on the following screen.

-
Select the file you want to transfer and touch [Start]. (If there is a password for transferring, input the password first, then touch [Start].)
-
After transfer is complete, the display unit restarts and the screen of the transferred project file is displayed.
Forced transfer by setting DIP switches
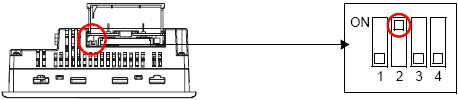
Set DIP switch 2 to ON to force the transfer of the project file. When using a model without DIP switches (such as the GP-3302B), use forced transfer by touching the screen.
-
Ensure that the display unit is turned OFF and then open the CF card cover at the bottom. Locate the CF card interface and DIP switches inside the cover and set DIP switch 2 to the ON position.
-
When the GP is turned ON and the following dialog box appears, transfer the project file from the GP-Pro EX. After forced transfer is complete, the display unit restarts and returns to the force transfer screen.
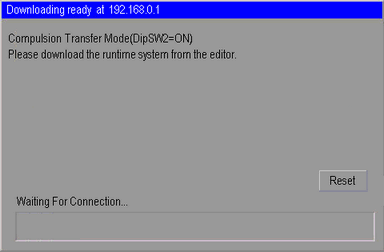
-
Turn OFF the display unit and then set DIP switch 2 to OFF. When you turn ON the display unit again, the above screen is displayed. Touch the [Reset] button. Always use the display unit with DIP switch 2 set to OFF except when forcing the transfer of project files.